Direct Email Best Practices
How to keep your online reputation squeaky-clean
When you run direct email campaigns, you want to do it in a way that maintains or improves your online reputation and avoids being blacklisted or marked as spam. Making sure the email addresses you get are clean and deliverable with Versium’s Validate service is the first essential step to reaching people’s inboxes. What you do with that email afterwards is just as, if not more, important. To improve the odds that your emails actually reach your targets’ inboxes, and your online reputation is intact so you can email another day, check out these email best practices and resources.
Why Emails Don’t Reach the Inbox
First, it helps to know some of the reasons emails can bounce or be filtered out of the inbox. These best practices can help you avoid these roadblocks to your emails being delivered:
- Blocked IP address — Email can bounce if your IP address gets blocked. Blocking can happen if you’re sending a lot of emails from one IP address.
- Blacklisting — If your domain is blacklisted, any email you send is blocked by any ISP that checks that blacklist site.
- ISP Spam Filters and Blocks — ISPs and email providers may block your email if it has words in their spam lists, or matches other criteria for spam (such as lots of links, misspellings, high user spam reports, or links that don’t match your displayed text).
- User blocks — Users may have filters and blocks up for unrecognized email addresses or specific words.
- Hard bounces — Hard bounces are caused by any of the above, and can also contribute to your IP being blocked or blacklisted.
NoteJust because you don’t receive a bounce notification doesn’t mean an email has been delivered to someone’s email inbox. Many of these blocks don’t provide any notification
Email Best Practices
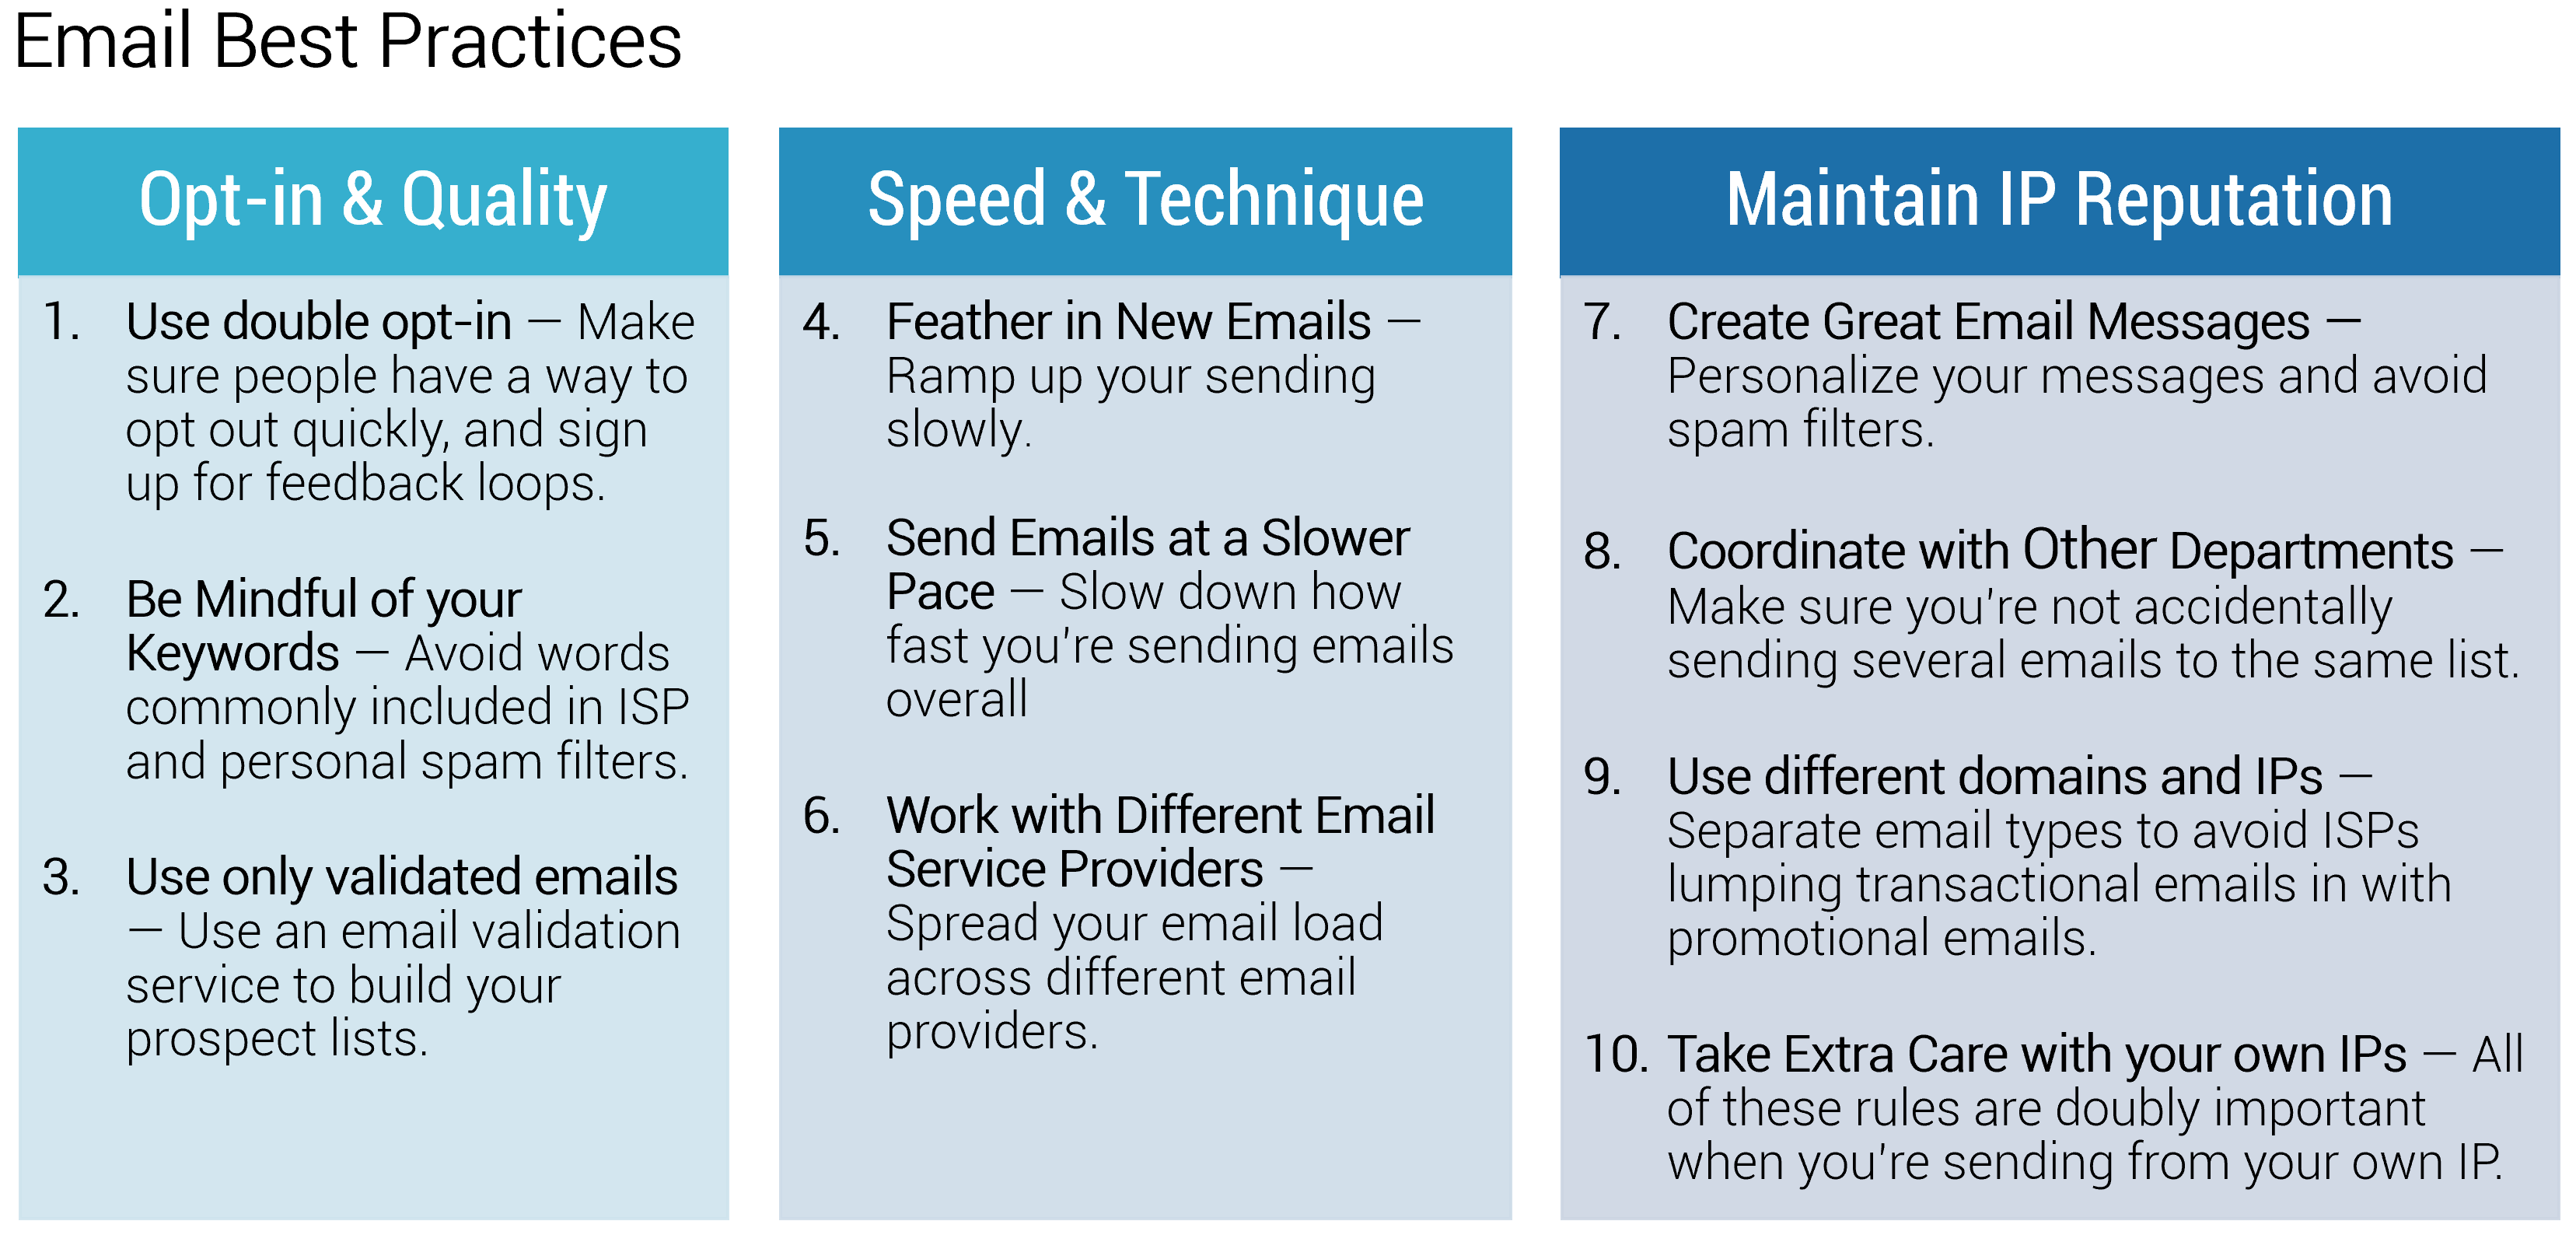
Now that you understand why emails are blocked, here are several ways you can increase the chances of your email getting through.All of these ways are explained in more detail below.
TipIf you do not have experience in managing email campaigns, consider using a professional email marketing company to manage your company emails.

Opt-in & Email Quality
Having a solid Opt-in solution, and quick and painless Opt-out links, and ensuring quality in sourcing and crafting your emails goes a long way towards making sure your email gets to the inbox.
1. Use double opt-in and sign up for feedback loops
Make sure you are sending to people who want to hear from you. Allow people to opt-out and honor their requests immediately and gracefully. One major reason emails get marked as spam is because the email is unwanted and there’s not a clear way to unsubscribe, or opt-out requests aren’t honored right away. Remember, you don’t gain anything from continuing to send emails to people who have opted out, and the best way to encourage them to opt back in sometime in the future is to respect their choices now. For more details about soft vs. hard bounces, and how to make sure you’re on top of your hard bounces, see The real reasons why your emails are bouncing- The science behind it.
Another useful tool is to sign up for feedback loops (FBL) to make sure you get notified when someone marks your email as spam. Check if your ISP has a Feedback Loop tool and get on it. Then clean up your lists to make sure you’re not continuing to send to people who’ve already marked you as spam.
2. Be Mindful of your Keywords

Certain industries likely to be scrutinized by mail providers and spam filters. Typically mail providers and spam filters are overly sensitive to emails that contain words that indicate they relate to any of the following verticals: payday, cash advance, loan, money, finance, credit score, work from home, business opportunity, beauty products, weight loss products, freebies, pills, dating, and other similar keywords.
3. Use only validated emails
One of the quickest ways to get blacklisted is running a campaign with poor quality emails. The higher the percentage of undeliverable emails, the more likely your campaign is to trigger blocking and spam filters.
Other options for improving the quality of your signups:
- Use Google’s reCaptcha to avoid sign-ups by bots that won’t confirm.
- Validate emails in real-time with an API that looks for disposable email addresses, like those from mailinator.com.
CautionEmails and other contact data supplied for an Ad-tech online audience are not appropriate for direct communication marketing campaigns. Online audiences frequently contain old, out-dated, and abandoned emails that work well for extending your reach with online ad targeting, however will result in high bounce rates and possible penalties if used in a direct email campaign. Maintain your IP reputation and ability to send emails by using only validated emails.
Email Speed and Sending Techniques
One of the things ISPs and blacklisters look for is spikes in email sending, especially from newer IPs. These techniques give you a way to slowly ramp up your sending in a way that’s less likely to attract attention.
4. Feather in New Emails
When you purchase a new email list, it’s good practice to slowly feather in the new email addresses, and use engagement to inform which addresses to keep. Consider the following example:
You have a list of 1,000 email addresses that you’re currently sending to, and purchase a list of 6,000 new email addresses. Here’s how you might approach feathering in the new addresses.
Feather in new addresses at a rate of 10% of your current list size. In this example, your first email, you add 100 new addresses.
Measure engagement on the new addresses, and only keep the ones that engage. For this example, let’s say 70 of the 100 respond in some way. Keep that 70, and remove the 30 that didn’t respond. You now have 1070 in your mailing list.
Your second email, again add 10%. That’s now 107 new addresses.
Again, measure engagement and keep only those who respond.
Continue the same approach until all 6,000 new addresses have been added.
5. Send Emails at a Slower Pace
Many error codes happen because the quantity of emails sent in a short period of time are not taken kindly by the mail servers. If you do not have a reputation with the mail server or your IP reputation is new or not highly regarded, these types of “rate limiting” issues are likely to occur. As mentioned above, feathering in emails — sending 10k new emails slowly throughout each day over 5 days is better than trying to send 50k in just an hour or just one day.
6. Work with Different Email Service Providers
Each email provider has a different threshold for or tolerance of sending to purchased email lists (if they allow it). This way your risk is spread out across different providers. If one says they’ll not let you send anymore, but you have your list split up between 3 providers, you could move that part of the list to the other 2 providers.
Maintain Your IP Reputation
Maintaining your IP and domain reputation with ISPs and email service providers is essential to your message getting through. These practices and the recommendations in the linked resources can help your email navigate the maze of spam filters and ISP blocks on the way to the inbox. Understand how these blockers work and craft your emails to pass through these gates to improve your email delivery rates and your conversion rates. For more great information on maintaining your IP reputation, see the article IP reputation – 7 ways to maintain it well.
7. Create Great Email Messages
Make sure your emails are ones that ISPs and email service providers view as legitimate.
Personalize your emails — Your emails are less likely to trigger spam filters if they’re personalized.
Run a spam checker — Run any emails through a spam checker before you send it. Here is a free one (https://www.mail-tester.com/).
Avoid being blacklisted — Reduce complaints and avoid spam traps to keep off the blacklists. A big part of this is to Understand and follow CAN-SPAM regulations. It’s the law, and it’s also good email etiquette.
8. Coordinate with Other Departments
Create a coordinated email strategy with other departments in your company to make sure you’re not accidentally sending several emails to the same list in a short period of time. Even if you’ve been following all of the other best practices, if a person gets several emails from your company, they’re more likely to opt out, and ISPs are more likely to flag your IP.
9. Use different domains and IPs
Use separate domains for your transactional (order confirmations, etc) and marketing emails. If you use the same domain and IP, Google and other ISPs might group all of your emails into the “marketing” bucket, increasing the odds you’ll get marked as spam.
10. Take Extra Care with your own IPs
If you are sending emails from your own IPs, you want to take even more precautions than you would sending with an ESP, because you don’t want your own IPs blacklisted or blocked.
Send emails at even a slower rate — Take even more care to feather in emails.
- Use IP Monitoring — Use an IP monitoring service that will let you know if your IPs wind up on a blacklist. If you wind up on blacklists, to get off, you will have to wait, or take specific actions required by that blacklist. Being on blacklists will restrict your ability to send emails.
- Use IP Warming — When you are working with new IPs, send emails slowly from the IP to start to build up your reputation over time. For more information, sign up to receive an IP Warming Guide from XVerify.
- Use IP authentication — Like DMARC (Domain-based Message Authentication, Reporting & Conformance), DKIM (Domain Keys Identified Mail) or SPF (Sender Policy Framework). Make sure your DNS reputation is good, and use CDN servers are also important to keep your IP reputation untarnished. Cloudflare is a service that provides both DNS management and CDN services.
- Pay attention to your nameserver too — Your nameservers’ reputation reflects on you too, so make sure you use a DNS provider with a good reputation.
- Use a CDN (content delivery network) service — Not only does this improve load times, but they have good reputations with ISPs and are less likely to be blocked.
- Use reverse DNS lookups — A PTR record maps an IPs to your host/domain, and is required by most ISPs. Click here for a great resource on PTR records.
Monitor your IP Reputation
Now that you’ve got some tools, make sure you’re monitoring your reputation so you can course-correct if it’s starting to fall. Check with your ISP to see if they offer tools, or check out Google Post Master or Hotmail tools for monitoring your IP.
Putting it All Together
Understanding how email gets blocked or blacklisted, you can structure your email campaigns well to avoid the pitfalls and increase the deliverability of your email campaigns, all while maintaining your IP reputation online.
More Reading
If you’d like to learn more, check out these resources:
- For more in-depth information on good email practices, see SendGrid’s Email Deliverability Guide.
- For information on how to write great contact emails, see The Power of Good Data: How to Maximize Success for Email Marketing.
- Find out your Sender Reputation from Return Path.
- Check whether your IP or domain has been blacklisted on BarracudaCentral or MXToolbox.
- Get on the Whitelist – Register your email at Emailreg.org
Updated 8 months ago
